Saturday, August 22, 2009

Plastering

In the last week the plasterers have been on the job. Two very good tradesmen working at mates rates. As the house is not your run-of-the-mill job, I told the plasterers to have a good look on site before pricing the work. They saw the nature of the work involved and proceeded with no qualms. However, I have since been told that there has been a fair bit of swearing going on up in the attic......tricky angles apparently.

The plasterboard sheets were delivered and stored in the garage.


The ceiling battens & ceiling lining went up on the first day.

Walls awaiting the plasterboard.

Plasterer busy at work. Both of the plasterers appeared on an episode of 'The New Inventors' last year. They now charge extra for having their photos taken.


We sound-insulated selected internal walls.


The ground floor plaster has been stopped up and only needs the cornice to finish off.


It's a messy job.


This is the entry foyer showcasing some of the angles that were the cause of much profanity. That's the designer up there completely oblivious to the mayhem he caused.


This is the room over the garage.


....and so is this.


...and again.
The house is coming along nicely. Once the stopping up and the cornices are complete the ceilings will be painted and the walls given the first coat of paint. After that we have about 550 metres of skirtings and architraves to install.
All for now.
Greg.

Wednesday, August 5, 2009

Busy times

Sorry about the long delay between blog posts. Yes, the house is still proceeding at a healthy rate. So much so that I have little time to spend on anything else hence the weeks of blog absence.
I have spent much of the past few weeks insulating the attic roof. This has been a very time consuming process as I have devised my own insulating method based on multiple air spaces, bulk insulation and concertina reflective foil batts. Most of my nights have been spent on site working by the light of an electric lantern. Consequently my design & drafting work has suffered a bit lately but thankfully my clients have been very patient.


The external walls have been insulated with reflective foil concertina batts. This type of insulation has a thermos-flask effect and works by creating 2 air spaces and creating a greater surface area because of its shape. It also reflects radiant heat and does not hold or emit heat.


I had the wardrobe insert5s built by the joiner at work. Mates rates.


A couple of weekends ago I enlisted the help of a first year carpentry apprentice. He built the bath hob and cut in some shower recesses. The plumber has also been to do his in-wall plumbing prior to plastering.

Upstairs in the attic I have insulated the perimeter walls with concertina batts and bulk insulated internally.


The attic roof has had a lot of thought ad attention bestowed upon it. An attic roof, as a rule, is a hot box in the summer. The temperature inside a roof in summer can be over 70 degrees Celsius, so building a roof in one can be troublesome. The main problem with summer heat gain is RADIANT HEAT. To combat this I devised my own insulation method. Firstly there is a layer of reflective concertina batts suspended 100mm from the underside of the roof. Then there is a layer of R2.0 Bulk insulation suspended on reflective foil sisilation 100mm below the concertina batts and 100mm above the plaster ceiling. This method creates 3 air gaps and prevents the bulk insulation touching the ceiling.


This is an excerpt from my daily planner when I first devised my insulating method. If you want to understand the importance of air gaps for insulating, try this practical demonstration.
Next time you have a cup of coffee, touch the side of the cup with your fingers. As you hold your fingers there notice how unbearably hot it is.......can't hold it for long can you? Now move your fingers only 1 millimeter away from the side of the cup........
The problem with bulk insulation in ceilings is that in summer it heats up and transfers that heat directly onto the ceiling and into the house. Providing an air gap and blocking the radiant heat in the first place will dramatically reduce the summer heat gain.

Electricians have roughed in in readiness for the plasterer.


The scaffolding was off-hired a few weeks ago and the site fence will also disappear soon. The site toilet made an early exit as it was blown over in a wind storm.
A lot more has happened but that's all I've got time for tonight. Must do some drawing work for those patient people.
Greg

Sunday, June 28, 2009

Roof Finished

This week the roofing contractor finished the roof. The garage floor was also concreted and the brickies finished the window sills.
Roof complete.

Just some more weatherboards to be installed, (and painted).


The remaining scaffolding will be taken away this week.


Almost there apart from the porch.


This is it so far.

Sunday, June 21, 2009

Roof almost finished

The builders have successfully tackled the front part of the roof. It is now almost complete apart from a few finishing touches and the installation of the shingles.
Despite the weather being cold and wet, I managed to finish paining the eaves and weatherboards before the scaffolding was taken down. I'm pretty happy with the end result.
Dormer and West gable completed.

Most of the scaffolding has now been removed.


Last week I had a few consultations on site with the builder about he roof form at the front of the house. It is important to have a strong working relationship with a builder to achieve a good result. This part of the roof was always going to be tricky. I decided not to detail it too much on my drawings but instead built a scale model of it for the builder to refer to on site. The scale model, some technical discussions and a bit of arm waving got the result we were after.


This is what remains of the scaffolding.


That's all for now. Better get back to drawing houses.
Greg

Monday, June 8, 2009

Bricks & painting weatherboards

This week the brick layers have been trying hard to finish off their works. Rain has been hampering their progress so they worked on Saturday and Monday (Queen's birthday) to catch up. They were rained off again on Monday and the weather was too cold for the mortar to set so they will be back on the job this week to hopefully finish off.
Brickies scaffold to reach the top of the wall.


Weatherboards have been installed to the dormer and the west gable. Instead of timber I have chose 'Hardies Linea' weatherboards which are a cement based product. They look identical to a timber weatherboard but are much lower maintenance. They do need to be painted but unlike a timber weatherboard this product will not deteriorate and will not require repainting after 10 years.


I have chosen another Hardies product for the eave lining. This lining is cement sheet and comes in a grooved finish to emulate timber lining. Again, low maintenance but with the desired aesthetic.


Coming along quite nicely.


The scaffolding on the west side is to be taken down soon so I decided to take advantage of it and paint the gable while I still have access.


I took a few hours off on Friday to make the most of the sunshine. Managed to get 2 coats of paint on the eaves an 1 coat on the gable. It was actually dark when I finished so I couldn't step back to admire my work until the next day. I had intended to get a second coat on over the weekend but the weather was against me.
We'll see how this week goes.
Greg.

Sunday, May 31, 2009

Roof & walls

Our roof is now 99% complete. Only the front porch to go.....once it's built.
The wall wrap has been installed, the windows are in and the brickwork has begun at the rear of the house.

The box bay window was delivered this week after a long wait. This particular window is double glazed and also made with low-E glass. The window faces west so the 'low emission' glass emits light but blocks radiation.

This is the arched window in my future office.


The large dormer window in the room over the garage.


The framing is almost complete in the upper level.


Dormer window over the garage. The external wall cladding will be applied this week.


The scaffolding on the east side has been removed now that the roofing is complete. The rest of the scaffolding will come down once we have clad the gables.


This is it so far. Not long til lock-up now. Brickies will be on the job this week as will the builders with the weatherboard wall cladding. I may even make an appearance with a paint brush.......We'll see.
Greg

Wednesday, May 20, 2009

Overdue Update

Due to a hectic workload and computer failure I haven't updated this blog for a while so here's a quick update.

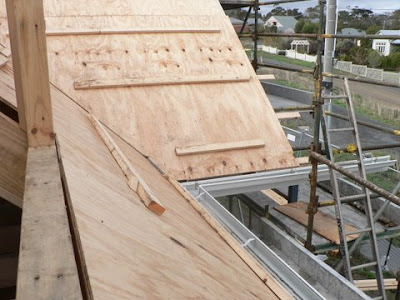
The plyboard has been applied to the front section of the roof. The horizontal timber battens you can see on top of the plyboard is just a temporary measure to make it safer and easier to climb up and down the roof.


This is a view from the window over the garage. The roof guttering is mid-way through installation.


A view of the room over the garage.

A snapshot of the progress so far.

Here come more bricks. Next week, weather permitting, the brickies will begin bricking up the walls.

Oops.
Why does there have to be someone with a camera watching when this sort of thing happens?
This is the side of building you don't see in the glossy brochures. It just proves that we're all human.
I have been receiving a lot of questions about our roofing system and I do intend to do a more detailed post with an in-depth explanation at a later date, but for now I'm out of time.
All for now
Greg.

Monday, May 4, 2009

More roofing

This week the roof progressed a lot further. As this type of roof construction has created a fair bit of interest I thought I'd show a few more photos and explain a bit further.


This photo is the front right hand side of the house. The scaffolding is required here due to the steep, (40 degree) pitch of the roof. Our roofing contractor is Canadian and he finds our regulatory safety measures to be quite amusing and a bit excessive compared to what he is used to.

The rear section of, (lower pitched) roof is now complete


As this type of roof is so well sealed, the ridge is ventilated as shown above to allow air to escape.


This photo shows the method of roofing construction quite well. The plyboard is nailed to the rafters and a metal 'drip edge' is fixed to the bottom edge of the plyboard where it meets the gutter. The 'drip edges' prevents water from seeping back into the timber roofing materials and directs it into the gutter.
The Underlay is stapled to the plyboard then the roof shingles are nailed over the top. The nails are covered by subsequent layers of shingles.
The little shiny blobs you can see on the shingles in the middle of the photo are a bituminous adhesive which is a part of the shingle. After installation when the roof heats up these blobs self-adhere to the shingle above to provide a stronger bond and a very high wind rating, (up to 190km/hr).


The valley section of the roofing is lined with a thick rubberised material. The underlay and the shingles overlap this material to provide a waterproof valley.


The rear section of the steep roof is almost complete.
I am very happy with the colour shade of the shingles, they are close to the local slate shade.
It was a bit of an educated guess when choosing the colour for this roof. This type of roofing can vary in it's perceived colour in different light. The manufacturer recommends that you look at an existing roof at different times of the day to get a true sense of colour rather than rely on photos but this is very hard to do if you don't live in North America and no-one around you has a similar roof.
Anyway, I think we chose well and the colour will tie in well with the brickwork.
Brickie should be on the job this week.
Greg.